
Canon LBP151dw , Static iP Address Setting
Setting IPv4 Address
The machine's IPv4 address can be either assigned automatically by a dynamic IP addressing protocol, such as DHCP, or entered manually. When connecting the machine to a wired LAN, make sure that the connectors of the LAN cable are firmly inserted into the ports (Connecting to a Wired LAN).
The machine's IPv4 address can be either assigned automatically by a dynamic IP addressing protocol, such as DHCP, or entered manually. When connecting the machine to a wired LAN, make sure that the connectors of the LAN cable are firmly inserted into the ports (Connecting to a Wired LAN).
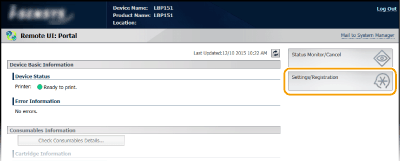
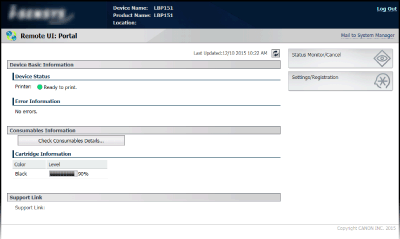
1. Start the Remote UI and log on in System Manager Mode. Starting the Remote UI
2. Click [Settings/Registration].
2. Click [Settings/Registration].
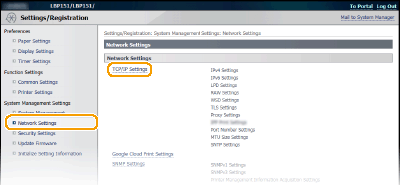
3. Click [Network Settings] [TCP/IP Settings].
4. Click [Edit] in [IPv4 Settings].
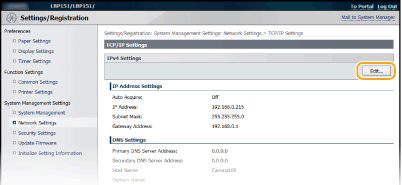
5. Set the IP address.

Automatically assigning an IP address
1. In the [Select Protocol] list, select [DHCP], [BOOTP], or [RARP].
Note :If you do not want to use DHCP/BOOTP/RARP to assign an IP address automatically
Select [Off]. If you select the [DHCP], [BOOTP], or [RARP] protocol when these services are unavailable, the machine will waste time and communications resources searching the network for these services.
Note: If [Off] is selected, change the setting to [On].
Even if Auto IP is enabled, IP addresses assigned via DHCP/BOOTP/RARP override an address obtained via Auto IP.
Manually entering an IP address (Static iP address Canon LBP151dw)
1. Select [Off] for [Select Protocol] and [Auto IP].
2. Set the [IP Address], [Subnet Mask], and [Gateway Address] fields.
6. Click OK
--------------------
****** Canon LBP151dw - Starting the Remote UI instruction
To operate the machine remotely, start the Remote UI by entering the machine's IP address in your Web browser. Before starting, check the IP address that has been assigned to the machine (Viewing Network Settings). If you do not know the machine's IP address, ask your network administrator, or start the Remote UI from the Printer Status Window (Starting from the Printer Status Window).
1. Start the Web browser.2. Enter "http://<IP address of the machine>/" in the address field, and press the [ENTER] key.

If you are using an IPv6 address, enclose the IPv6 address with brackets (example: "http://[fe80:2e9e:fcff:fe4e:dbce]/").
Note :
If a host name for the machine is registered with a DNS server
Instead of <IP address of the machine>, you can enter <"host name"."domain name"> (example: "http://my_printer.example.com").
If a security alert is displayed
A security alert may be displayed when communication with the Remote UI is encrypted (Enabling TLS Encrypted Communication for the Remote UI). If there are no problems with certificate settings or TLS settings, continue browsing to the Remote UI site.
3. Select [System Manager Mode] or [General User Mode].
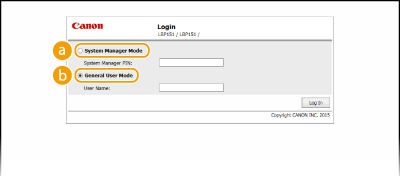
[System Manager Mode]
You can perform all Remote UI operations and make all settings. If a PIN (system manager password) has been set, enter it in [System Manager PIN]. (Setting System Manager Passwords) If a PIN has not been set (factory default setting), you do not need to input anything.
[General User Mode]
You can check the status of documents or the machine, and you can also check the settings.
4. Click [Log In].

Starting from the Printer Status Window
If you do not know the machine's IP address, you can start the Remote UI from the Printer Status Window.
1. Select the machine by clicking  in the system tray.
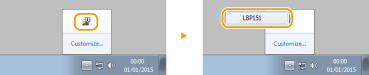
2. Click .
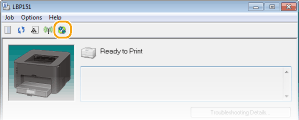
Your Web browser starts, and the login page of the Remote UI appears.
Note :
If a security alert is displayed
A security alert may be displayed when communication with the Remote UI is encrypted (Enabling TLS Encrypted Communication for the Remote UI). If there are no problems with certificate settings or TLS settings, continue browsing to the Remote UI site.
3. Select [System Manager Mode] or [General User Mode].

[System Manager Mode]
You can perform all Remote UI operations and make all settings. If a PIN (system manager password) has been set, enter it in [System Manager PIN]. (Setting System Manager Passwords). If a PIN has not been set (factory default setting), you do not need to input anything.
[General User Mode]
You can check print documents, check the status of the machine, and view machine settings.
4. Click [Log In].


Canon Lbp151Dw , Static Ip Address Setting - Canon User Guide >>>>> Download Now
ReplyDelete>>>>> Download Full
Canon Lbp151Dw , Static Ip Address Setting - Canon User Guide >>>>> Download LINK
>>>>> Download Now
Canon Lbp151Dw , Static Ip Address Setting - Canon User Guide >>>>> Download Full
>>>>> Download LINK
Canon Lbp151Dw , Static Ip Address Setting - Canon User Guide >>>>> Download Now
ReplyDelete>>>>> Download Full
Canon Lbp151Dw , Static Ip Address Setting - Canon User Guide >>>>> Download LINK
>>>>> Download Now
Canon Lbp151Dw , Static Ip Address Setting - Canon User Guide >>>>> Download Full
>>>>> Download LINK fu
You can hire Cr8 Decorating Services to give any room in your house a fresh coat of paint. If you want the best price possible, you should get several quotes from different companies. These painters can also source paint for you at lower prices than you would get at the store. If you want to refresh the look of a room in your home, you can contact a Decorator Croydon. These professionals can change the overall appearance of a room and also improve the life of the colours.
ReplyDelete